Duke of Westminster’s
Armoured Car Corps
One of the interesting stories to come out of the Western Desert campaign was the expedition across the Egypt/Libya border to rescue the crew of the HMS Tara who were being held by the Senussi in a remote desert camp. The captives were freed by the Duke of Westminister's Armoured Car Corps on 17 March 1916. This is the story.
Sollum, Western Egypt

The British forces regained Sollum (Athol and the 2nd Camel Company were part of this force) and its valuable little
port, at dawn on March 14. On the
same day an abandoned enemy car was found by one of The Duke of Westminster’s Armoured
Car Corps officers. He searched the vehicle and came across a letter written in
French. He kept this and the next day turned it over to Military Intelligence
at Sollum. It turned out to be a letter from Captain Gwatkin-Williams RN and was
originally intended for the Turkish Commander at Sollum. It requested food,
clothes, boots, medicine and other necessities, and importantly had the origin
of the letter as ‘Bir Hakkim’ and the date ‘1 February 1916’. From this
intelligence, the British knew that about six weeks previously the prisoners of the
HMS Tara were at Bir Hakkim.
Unfortunately, this location was not on any map – they had no idea where it was.
As it happened a local Arab man offered himself as a guide at about the same
time the letter’s import was determined. He claimed to have visited Bir Hakkim
with his father some 30 years previous to graze livestock. He said the well at
Bir Hakkim was also known to those tribes familiar with the area. The guide, Achmed,
‘thought’ he could find his way there.
On hearing about the letter and the guide the Duke of Westminster
suggested that he lead his Armoured Car Corps to Bir Hakkim and liberate the Tara prisoners. General Peyton, the most senior military officer in Sollum, agreed. The 2nd Camel Corps was to bring up the rear and remain at a camp, Bir Agiza, about 18 miles south-west of Sollum, on the way to Bir Hakkim.
The Duke's collection of vehicles included modified Rolls Royces and Fords. It appears that three vehicles had machine guns mounted on them - most were modified in some way and included armoured panels. The Duke paid for many of the vehicles privately and one was his personal car - purchased by him in 1914 - a Rolls Royce Silver Ghost.
The Duke of Westminster on 17 March 1916 at Bir Hakkim immediately after the rescue
The vehicles were prepared and supplies assembled. Achmed
and another guide were employed. The convoy of vehicles departed on 17 March. First, the escarpment behind Sollum
needed to be climbed (see image at the top of this blog-post). The terrain was difficult as the vehicles had to be got up
700 feet to the top of steep, narrow, rocky track. The vehicles had to negotiate hairpin
loops and even some rocky steps to reach the start of the expedition. The accompanying cameleers
also found this track difficult. Eventually 43 touring cars and ambulances were
assembled at the top. Additional petrol, water and stores were man-handled up this
pass.
From the top, it was estimated that the convoy needed to cover about 70
miles to Bir Hakkim and about the same distance back to Sollum. However, no one
really knew exactly where they were going, how far they needed to travel and what
type of terrain lay ahead. They had no idea of enemy locations nor strength.
After the initial climb the next 50 miles were quite flat.
They were still on a ‘road/track’ at mile 65. Apparently the guide did not
really know how much further they had to travel. A little later they came upon
a small camel and horse caravan. The two white horses were ridden by Turkish
officers who galloped off when the motor vehicles approached. One escaped,
although his horse was shot from under him and the other officer turned out to
be a Turkish Surgeon General. The rest of the caravan was destroyed and the doctor
released and left in the desert.
The convoy continued and the desert became stony and rough. At about 82
miles the guides directed the convoy off the road and across open desert. They
skirted the edge of some low hills. They passed the 90 mile mark then the
100 mile mark. The Duke had now led his men into Libya and deep into enemy territory.
They were following the directions of two
Arab guides who were now arguing amongst themselves. They were half way through
their petrol. The Duke persisted and they passed the 110 mile point. By now the convoy had
been driving for many hours and most of the men thought they should turn around. It was mid afternoon and it must have crossed the mens' minds that most of the return journey would have to be made in the dark. Anxious faces turned to the Duke.
Armoured Car driver Arthur Jenkins and his supply vehicle on the Bir Hakkim expedition.
Note the addition of armour plating and machine gun.
At the 115 mile point the guide, Achmed, who had been peering
out to the left, shouted excitedly and jumped from the Duke's moving vehicle. Way off in the distance he had
sighted the fig tree he was looking for. No one else could see it. They had
another 12 miles to go but this was an important way-finder for the guide. They
headed towards this tree.
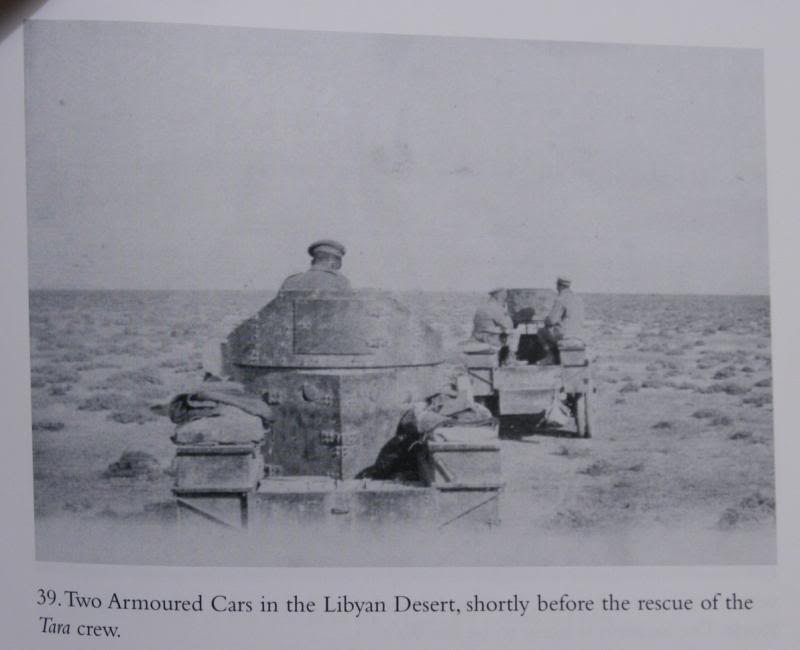
The Armoured Car Corps on their way to Bir Hakkim on 17 March 1916
When they thought they could see tents in the far distance
the Duke sent one car ahead to reconnoiter. Another followed shortly after. Soon
the vehicles heard a cheer. That was 3pm on 17 March 1916. The rest of the
vehicle convoy sped towards the camp.
At the camp, the prisoners thought the approaching car was probably
Turkish. But there was not much time for discussion and supposition.
It all happened very quickly. Forty-three cars appeared out
of the dust and there was a skirmish. Some of the Senoussi guards were killed and others escaped. The British surgeon was very nearly shot by one of the Senoussi guards but the bullet flew between his legs. His ambulance contained tins of food which were distributed
immediately. Tins of chicken meat and condensed milk were among the treats. There was also some bread and cheese. The men started eating immediately. The cigarettes were popular.
Captain Gwatkin-Williams (right) upon being rescued on 17 March 1916 at Bir Hakkim. Note he is still in RN uniform, the clothes he was wearing when the Tara was torpedoed on 5 November 1915. He lost his cap when the ship went down and is here wearing a canvas 'hat' he made himself. He had lost a great deal of weight and noted that he weighed the same on 17 March 1916 at his rescue as he did as a 15-year-old boy.
After 15 minutes in the camp at Bir Hakkim, the vehicles started the return journey. Some of the men
were virtually naked or in rags and these men were issued blue hospital suits. Those too
ill to walk were carried to the motor ambulances. It was a long and risky drive ahead and the convoy with extra passengers was not yet out of danger.
Bir Agiza (18 miles south-west of Sollum) was their destination and the early vehicles arrived
at about 11pm with some not in camp until 3am. The total drive that day was
about 250 miles. All 43 vehicles accomplished the whole journey with not one
breaking down on the way. At Bir Agiza Athol and his 2nd Camel Company were waiting for their return. They served them hot tea and Bovril and he notes in his letter to his mother: 'You should have seen them eat Bully Beef, and boiled foul and tea. Also they greatly appreciated a wash. I threw my towel away after about three had used it.' He also noted there were some crew members from HMT Moorina and said there were two Australians on the Moorina (I'm not so sure about this).
The following day the Armoured car corps and Tara/Moorina crews continued another 18 miles to Sollum. Athol's camel corps followed them. The last part of the Tara crew's journey took them to some ancient ramparts from which
was flying the Union Jack, a welcome sight, and from there they could see Sollum. The narrow pass
had to be negotiated – that steep hill of 700 feet which the prisoners were
carried on Camels.
At Sollum a converted Egyptian gunboat, by then a hospital ship,
was waiting for the men and they were sailed to Alexandria.
Paddy the ship’s dog travelled with the men from Bir Hakkim
to Sollum where he was acquired by the Armoured Car Corps and lived with them
for four months. He was killed by accident and given a military funeral. He is
buried at Mersa Matruh.
The survivors of the HMS Tara in London not long after their return to Britain in 1916.
The story of the HMS Tara rescue reached the London papers and was a important positive story for those on the home front in England. There was only bad news coming from France in March 1916, so the Duke's motorcar adventure must have been a welcome spot of brightness. I don't think there were any accounts sent to Melbourne. As usual, Athol's sketchy, matter-of-fact letter doesn't really do justice to the tale.
I can recommend the wonderful account of the HMS Tara, her crew's captivity and rescue by Captain R.S. Gwatkin-Williams CMG, RN, 'Prisoners of the Red Desert', which can be found at: